
2012-9-27
android: n番目のビュー(ボタンなど)を逆指名する
症状:
android ではビューの ID を設定するとき、button1 などのように、「ビュー + n」というように名づけることが多い。
すると、小生のような数理系文系プログラマ(=得体の知れない輩)は、だったら findViewById(int("R.id.button" + n)) みたいな感じに変数 n を代入してボタンを指名できないか、と考えてしまう。
解決法:
残念ながら(人によっては「当然ながら」だろうが)、上記のような方法ではドロイド君は騙されてくれない。
ということで、変数 n を取得したら switch でビューに挙動を割り当てる、という方法でやれば、ここでやりたいことが実現できる。
たとえば、コードはこんな感じ。
public class MainActivity extends Activity implements View.OnClickListener {

    @Override
    public void onCreate(Bundle savedInstanceState) {
        super.onCreate(savedInstanceState);
		requestWindowFeature(Window.FEATURE_NO_TITLE);
        setContentView(R.layout.activity_main);

        Button b1 = (Button) findViewById(R.id.button1);
        	b1.setOnClickListener(this);
        	b1.setText("変更前");
        Button b2 = (Button) findViewById(R.id.button2);
        	b2.setOnClickListener(this);
        	b2.setText("変更前");
        Button b3 = (Button) findViewById(R.id.button3);
        	b3.setOnClickListener(this);
        	b3.setText("変更前");
        Button b4 = (Button) findViewById(R.id.button4);
       		b4.setOnClickListener(this);
        	b4.setText("変更前");
        Button b5 = (Button) findViewById(R.id.button5);
        	b5.setOnClickListener(this);
        	b5.setText("変更前");
        Button bd = (Button) findViewById(R.id.button_d);
        	bd.setOnClickListener(this);
    }

   	public void onClick(View v) {
        Button bd = (Button) findViewById(R.id.button_d);
    	if (v == bd) {
        	EditText et = (EditText) findViewById(R.id.editText1);
        	String num = et.getText().toString();
  			int n = Integer.parseInt(num);
  			switch (n) {
  			case 1:
  		        Button b1 = (Button) findViewById(R.id.button1);
  				b1.setText("変更後");
  	        	TextView tv1 = (TextView) findViewById(R.id.textview1);
  	        	tv1.setText(num);
  				break;
  			case 2:
  	  	        Button b2 = (Button) findViewById(R.id.button2);
  				b2.setText("変更後");
  	        	TextView tv2 = (TextView) findViewById(R.id.textview2);
  	        	tv2.setText(num);
  				break;
  			case 3:
  	  	        Button b3 = (Button) findViewById(R.id.button3);
  				b3.setText("変更後");
  	        	TextView tv3 = (TextView) findViewById(R.id.textview3);
  	        	tv3.setText(num);
  				break;
  			case 4:
  	  	        Button b4 = (Button) findViewById(R.id.button4);
  				b4.setText("変更後");
  	        	TextView tv4 = (TextView) findViewById(R.id.textview4);
  	        	tv4.setText(num);
  				break;
  			case 5:
  	  	        Button b5 = (Button) findViewById(R.id.button5);
  				b5.setText("変更後");
  	        	TextView tv5 = (TextView) findViewById(R.id.textview5);
  	        	tv5.setText(num);
  				break;
  			default:
  				break;
  			}
	    }

        switch (v.getId()) {
        case R.id.button1:
        	TextView tv1 = (TextView) findViewById(R.id.textview1);
        	tv1.setText("あ");
        	break;
        case R.id.button2:
        	TextView tv2 = (TextView) findViewById(R.id.textview2);
        	tv2.setText("い");
        	break;
        case R.id.button3:
        	TextView tv3 = (TextView) findViewById(R.id.textview3);
        	tv3.setText("う");
        	break;
        case R.id.button4:
        	TextView tv4 = (TextView) findViewById(R.id.textview4);
        	tv4.setText("え");
        	break;
        case R.id.button5:
        	TextView tv5 = (TextView) findViewById(R.id.textview5);
        	tv5.setText("お");
        	break;
        }
   	}
}
上記のコードは、「ユーザが入力した値に対応するボタンの挙動を操作する」、というもの。「ユーザが選択したボタンを押した結果が変数に入る」のが「指名」とすれば、「逆指名」というような感じ。(ここでの定義はあいまいなので、あくまでフィーリングで)
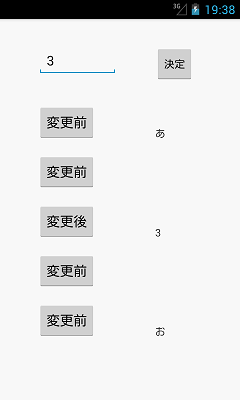 実行結果は左のスクリーン・ショットの通り。
ユーザが「3」を入力。「決定」を押すと n = 3 となる。ここで、3番目のボタン(ビュー)の文字を変える。実際に「変更前」が「変更後」に変わった。
ビューであれば、ボタンに限らないので、ボタンの右に「3」と表示されているのは、テキストビューに送った場合。
上記の操作にかかわらず、「決定」以外のボタンを押したときのそれぞれの挙動は、上記の挙動と独立している。左のスクリーン・ショットの場合は、一番上と一番下のボタンを押して、それぞれ右に「あ」、「お」と表示されている。


 Contact