トップページ > dsPIC入門 > Javaでシリアル通信(6)
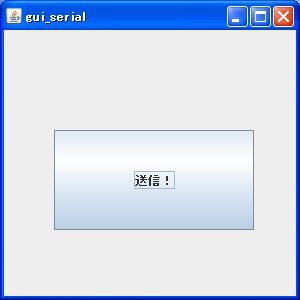
ボタンをクリックすると、シリアルポートから“right”と送信します。 COMポートの選択ができると便利…とか、その他の文字が自由に送れるといいなぁ…などなど、 思うところはあるのですが、今回は非常に単純にして雛型として押さえておくことにします。
import javax.swing.*;

import java.awt.*;
import java.awt.event.*;

import gnu.io.*;
import java.io.*;


public class gui_serial
{
 public static void main(String[] args)
 {
  //Frameを生成
  JFrame frame = new JFrame("gui_serial");

  //閉じる処理を指定
  frame.setDefaultCloseOperation(JFrame.EXIT_ON_CLOSE);

  //サイズを設定
  frame.setSize(300,300);

  //見えるように…
  frame.setVisible(true);

  //コンテントペインを生成
  JPanel contentPane = new JPanel();

  //ボタン生成の際に、アクションをセットします。
  JButton button = new JButton(new button_action());

  //ボタンを、コンテントペインへ登録
  contentPane.add(button);

  //コンテントペインを、フレームへ登録
  frame.setContentPane(contentPane);

  //レイアウトは、今回はマニュアルで指定。
  contentPane.setLayout(null);

  //ボタンを中央に配置
  button.setBounds(50,100,200,100);


 }
}


//******************************************************************************
//******************************************************************************
//ボタンが押された際のイベント処理は、アクションクラスとして完全にクラス化!

class button_action extends AbstractAction
{
 button_action()
 {
  putValue(Action.NAME,"送信!");
 }

 public void actionPerformed(ActionEvent e)
 {


    //**********************************************************************************************
    //前に書いた送信プログラムを、コピー&ペースト

    try
    {

      CommPortIdentifier ports = CommPortIdentifier.getPortIdentifier( "COM5" );

      CommPort commPort = ports.open("hoge",2000);
      SerialPort port = (SerialPort)commPort;

      port.setSerialPortParams( 115200,SerialPort.DATABITS_8, SerialPort.STOPBITS_1, SerialPort.PARITY_NONE );
      port.setFlowControlMode( SerialPort.FLOWCONTROL_NONE );

      OutputStream out = port.getOutputStream();

      out.write( 'r' );
      out.write( 'i' );
      out.write( 'g' );
      out.write( 'h' );
      out.write( 't' );
      out.write( '\r' );


      out.close();
      port.close();
    }
    catch( Exception ex )
    {
     System.out.println( "Error発生:" + ex );
    }
    //**********************************************************************************************
 }

}
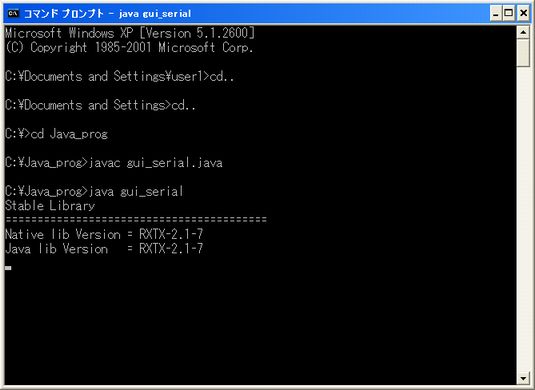
GUIなのですが、起動はやっぱりコマンドプロンプトから…。なんか、おかしい感じがしますけど(汗)
普通のWindowsでいうところの.exeファイルは、そのまんまダブルクリックすることでプログラムが 開始されます。自作のJavaプログラムも、あんな感じで起動できたらうれしいですよね。
まず、元のソースコードがあるディレクトリに、“マニフェスト・ファイル”を作成します。 普通のテキストファイルなのですが、拡張子を“.mf”にしておきます。ファイル名は任意です。 今回はもとのソースコードと同じ名前にして、「gui_serial.mf」というファイルを作りました。
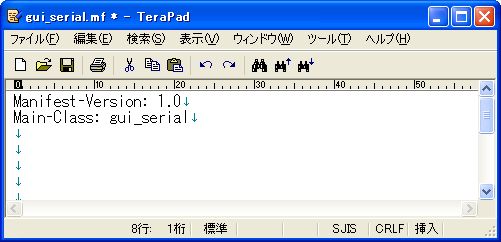
あとは、上のような感じで書くだけです。“Main-Class:”のところには、メイン関数があるクラスを 記述します。今回は1つしかないので、そのまま“gui_serial”と書きます。拡張子は書かなくてもいいみたいです。
ソースファイルがあるディレクトリにマニフェストファイルを保存した上で、コマンドプロンプトにて 以下のコードを実行します。欲しいjarファイルの名前、マニフェストファイルの名前…を指定します。
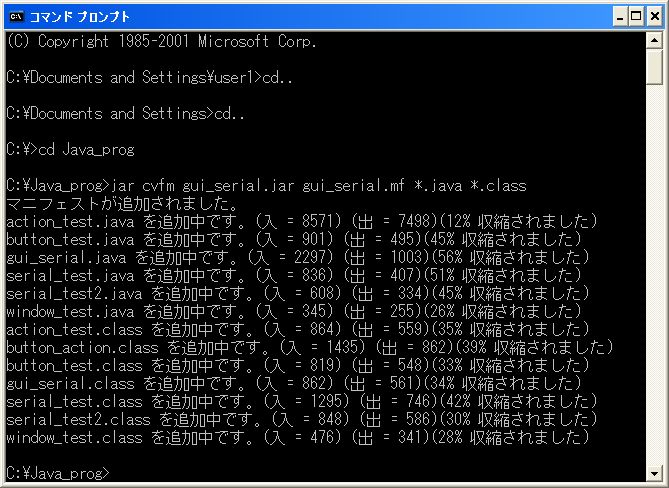

…で、出来上がった.jarファイルをダブルクリックすると、今回作ったプログラムが実行されます。